
By default, to secure an RDP session Windows generates a self-signed certificate. During the first connection to an RDP/RDS host using the mstsc.exe client, a user sees the following warning. We need to configure SSL certificate and install it to get rid of the message below.

On your local Certificate Authority, run certsrv.msc> Right click Certificate Templates> Choose Manage

Right click Computer> Choose Duplicate Template

Name your certificate as you wish and choose "Publish certificate in Active Directory"

Open "Extension" tab and Edit Application Policies

Remove "Client Authentication"
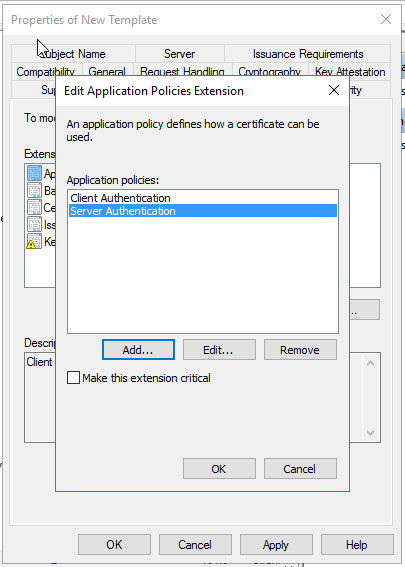

Click Add

Select New

Give a name for this new application policy. Object identifier for Remote Desktop Authentication is : 1.3.6.1.4.1.311.54.1.2
Click OK and return to Properties Window

Click Security tab > Select Domain Computers> Make sure Read and Enroll is selected

Click Cryptography Tab> Change Key Size to 4096

Click Request Handling Tab > Put a tick "Allow private Key to be exported" checkbox. Click Apply and OK.

Return to CertSrv.msc main window.> Right click Certificate Templates > New > Select "Certificate Template to issue"

Enable the certificate "RDS-SSL-Cert" by clicking OK

We need to import a PFX certificate to our collections' deployment properties. It is not configured as you can see but first we need to create the pfx certificate.

Log onto your RDS web access server > Start IIS > Double click Server Certificates

Select "Create Domain Certificate"

Type the FQDN of the web access server into Common Name field. Fill the rest of the textboxes as it you need

Select the CA Server and give a friendly name to your certificate

View the certificate you created

Click Details > Choose Copy To File

Select Yes, export the private key

PFX is selected

Type a password for the PFX certificate

Save it

Complete the wizard.

Now we can import the PFX certificate to RDS Broker. Server Manager > Select Collections > Task > Edit Deployement Properties > Certificates > Select a Role Service that is displayed as Not Configured > Select Existing Certificate > Browse for the PFX certificate > Enter Password > Make Sure "Allow the certificate to be added... " checkbox is selected > Click OK. Do this procedure for each unconfigured role services

Certificate is installed for all Role Services succesfully

We need to specify if we want to enable SSL for a specific collection. So select a collection > Tasks > Edit Properties>

Choose Security> Set Security Layer as SSL. Click Apply and OK.

When you make a RDP connection to the servers you will not get the warning message below anymore.