In this article, I will mention how to create the SAP single package and SAP 7.30 deployment.
First, lets start with creating the package. Run NwSapSetupAdmin.exe which resides under SAP Installation folder. SAP Installation Server Administration Tool will start and select New Package.

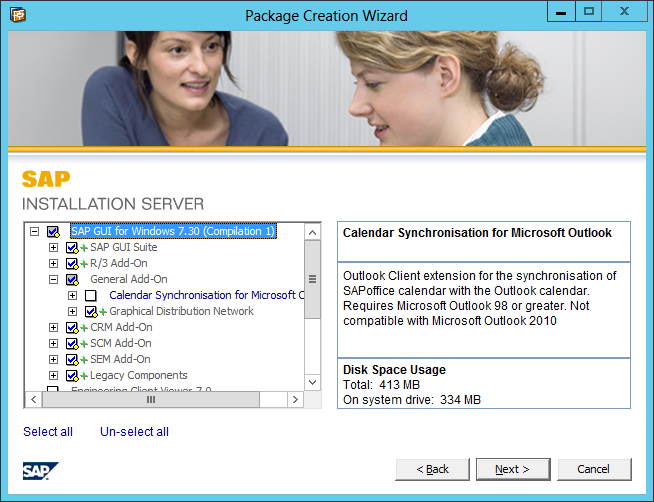
Select the components that you need but do not select Calender Sync because it gives an error during the deployment.

Name your new package

Use the same name for command-line name, so do not change anything just click Next

Package is created.

Go back SAP Installation Administration Tools. Click on Configure Packages tab and click Expand Editor.

Select "On End Install" and right click on the empty field and select Insert Script

Select Sample 1: Copying a file and hit Insert

Do not change anything here, just go ahead and hit Save

Now we need saplogon.ini. If there is a PC around you with sap installed, then just search for saplogon.ini on windows. If not, You need to install SAP on a PC first. Then enter the sap connection information such as "Application Server" , "Instance Number", "System ID", SAPRouterString . After this Saplogon.ini file will be created automatically under C:\Users\yourusername\AppData\Roaming\SAP\Common
Under the SAP Installation Folder, create a folder named CustomerFiles and copy saplogon.ini into that folder.


On SAP Installation Server Administration Tool, select the package that you created earlier. Select Packages from the menu and select Create Package Definition File

Save it on Desktop. This process will create pdf and sms files.

Select Package from the menu, and now select Compress to single–file installer

This creates the Single File Installer and I am saving it to Desktop for now.

It creates an exe file named SAP7.3SinglePackage_20140417_1811.exe

Now we will copy our single package installer to a shared folder named SAPSinglePackage on a server. Also copy the pdf and sms files into this folder.

Our single package is ready. It is best to test this package on a computer before we deploy it over SCCM. Copy this package to a computer and run the command below.

If User Account Control is enabled on that computer, it will ask your approval for the installation. Do not worry about if UAC is on or off because SCCM uses admin priveledges and bypasses UAC.
Now we should create a package on SCCM Console.


Standard Program option is selected

If you want installation to be silent you can use the switch /silent instead of /noDlg. Run Mode must be Run with Admin rights.


SCCM Package is created too.

We can now deploy our package to collections


For other windows just click Next button and complete the deployment.

