
MinIO is a high-performance, distributed, and open-source object storage system. It offers an API that is fully compatible with Amazon S3. It is generally used for storing large media files such as videos, images, etc. It also can be used as a persistent storage in Kubernetes Clusters. MinIO is written in Go language whşch makes it lightweight and fast. It can run on VM's, docker or Kubernetes.
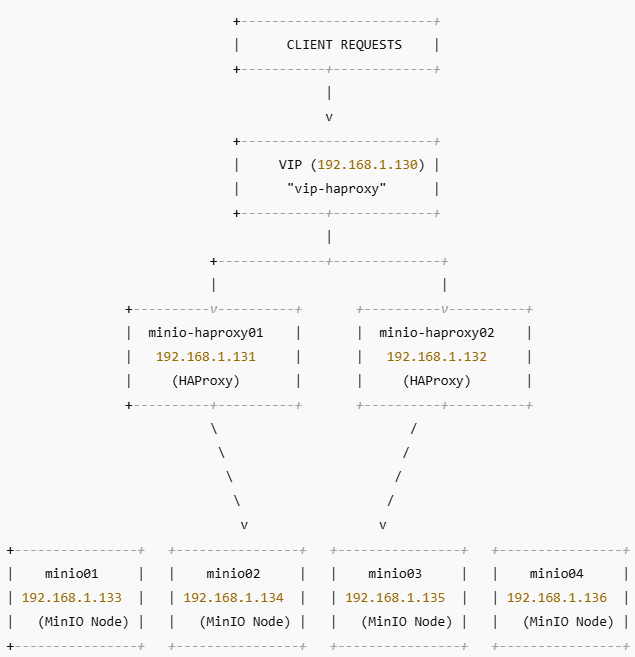
In this post, I will be installing MinIO Cluster on Ubuntu 24.04 VMs. The topology will be as below. Each minio node will have and secondary disk and the minIO data will be kept in this secondary disks.
I assume we all have assigned the ip addresses and hostnames. In minIO configuration we will use hostnames, therefore make sure you added ip addresses and hostnames in your /etc/hosts files.
ADDING THE SECOND DISK:
After we add the second disks on each node, we can run the following command to rescan disks. That way we don't have to restart the operating system.
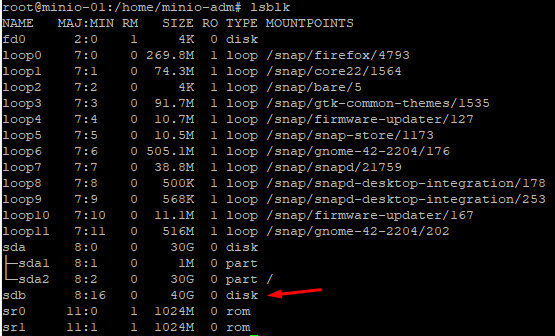
for host in /sys/class/scsi_host/*; do echo "- - -" | sudo tee $host/scan; ls /dev/sd* ; done40GB secondary disk is shown as sdb. I am going to format this disk as LVM now.
We will use fdisk utility to create a new partition
fdisk /dev/sdb
Hit “n” (meaning new partition)
Hit “p”  (meaning primary parition)
Hit enter 3 times to accept default values
Hit “t” and type "8e" (To give LVM 8e hexadecimal code)
Hit “w” to save

To display the partition we just create run the following command
fdisk -l
Create Physical Volume, Volume Group and Logical Volume
pvcreate /dev/sdb1
vgcreate miniovg1 /dev/sdb1
lvcreate -n s3data1 --size 39G miniovg1
lvdisplay

MinIO recommends XFS for production use in their documentation. Therefore our filesystem will be XFS.
apt install xfsprogs
mkfs.xfs /dev/miniovg1/s3data1
Create data folder for minio. Parameter -p creates all the folders which does not exists in the given path.
Then edit fstab and add the last line at the end of fstab. That way our mount point will not be lost after a reboot.
mkdir -p /minio/data1
nano /etc/fstab
/dev/miniovg1/s3data1 /minio/data1 xfs defaults  0 0
Run the following commands to mount our new partition.
systemctl daemon-reload
mount -a
df -h           #check if you can see the partition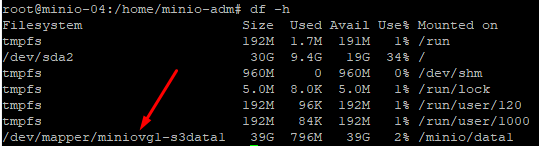
MINIO INSTALLATION:
Download and install the minIO package.
wget https://dl.min.io/server/minio/release/linux-amd64/archive/minio_20241107005220.0.0_amd64.deb -O minio.deb
dpkg -i minio.deb     #install the package
Create a service user named minio-user that can not logon. Set /minio directory's owner as minio-user.
useradd -r minio-user -s /sbin/nologin
chown -R minio-user:minio-user /minio
MINIO CONFIGURATION:
We need to edit minio config file.
nano /etc/default/minio
Copy and Paste the following lines into /etc/default/minio and save it.
# Set the hosts and volumes MinIO uses at startup
MINIO_VOLUMES="http://minio-01/minio/data1 http://minio-02/minio/data1 http://minio-03/minio/data1 http://minio-04/minio/data1"

# The following explicitly sets the MinIO Console listen address to port 9001
MINIO_OPTS="--console-address :9001"

# Set the root username. This user has unrestricted permissions to perform S3 and administrative API operations on any resource in the deployment.
MINIO_ROOT_USER=admin

# Set the root password
MINIO_ROOT_PASSWORD=YourPassword!
Configure Firewall and start minIO service.
Restart MinIO and enable minIO service to start automatically after a reboot.
ufw allow 9000:9001/tcp
ufw allow 22

systemctl daemon-reload
systemctl restart minio
systemctl enable minio
You can check if minIO running without problems on each node with following command
journalctl -u minio.service -f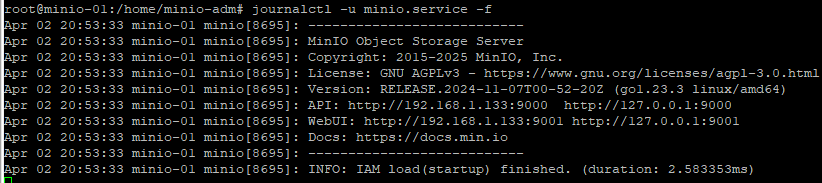
You can browse: http://minio-ip-address:9001 and logon by using the admin credentials you specified in the config file.

In the Next Post, We will be configuring HAProxy for our minIO cluster.