
In this article, We are going to build our own Kubernetes (K8s) cluster with kubeadm. Our operating system is Rocky Linux 9.5. Our cluster will have
3 x Master nodes
3 x Worker nodes
2 x haproxy nodes.

We are going to use following Kubernetes Components:
Containerd: The default and recommended container runtime for K8s. It creates, executes, and supervises containers. It is a daemon process that creates, starts, stops, and destroys containers. It is also able to pull container images from container registries, mount storage, and enable networking for a container.
Kubeadm: is an official Kubernetes tool for bootstrapping (installing) a Kubernetes Cluster. It configures etcd (the database of K8s), sets up API server, Controller Manager, Scheduler, configures kubelet on each node.
Kubelet: primary agent that runs on every node (Master & Worker). It is a system service (daemon) responsible for:
Managing Pods on the node
Talking to the Container Runtime (containerd, Docker, CRI-O)
Communicating with Kubernetes Control Plane (API Server)
Kubectl: is the command-line tool used to interact with a Kubernetes cluster.
Etcd: is the brain of a Kubernetes cluster. It is a key-value store used by Kubernetes to store all cluster data.
Calico CNI Plugin: Kubernetes itself does not handle pod-to-pod networking directly. Instead, it relies on a CNI plugin to provide networking features. We will use Calico CNI Plugin for this purpose.
Before starting installation, I assume you assign hostnames, ip addresses and change /etc/hosts file as follows:
192.168.204.20 k8svip
192.168.204.21 haproxy1
192.168.204.22 haproxy2
192.168.204.23 master1
192.168.204.24 master2
192.168.204.25 master3
192.168.204.26 worker1
192.168.204.27 worker2
192.168.204.28 worker3
Update system on all nodes:
sudo su
dnf update -y && dnf install -y epel-release
dnf install -y vim curl wget net-tools bash-completion
Install containerd (on Master and Worker Nodes):
dnf config-manager --add-repo https://download.docker.com/linux/centos/docker-ce.repo

#Refresh the local repository information
dnf makecache

#Install the containerd.io
dnf install -y containerd.io

#Back up the default configuration file for containerd
mv /etc/containerd/config.toml /etc/containerd/config.toml.bak

#Create a new file with the default template and open it
containerd config default > config.toml
nano config.toml
Find SystemdCgroup with Ctrl +W and change the value to “true”. Save the file and exit. This tells containerd to let systemd manage the cgroups (control groups) for containers. This provides recommended, better integration with OS.

#Place the new file to /etc/containerd/config.toml
mv config.toml /etc/containerd/config.toml
We should let crictl about the socket that it should use.
sudo nano /etc/crictl.yaml

#add the following into /etc/crictl.yaml
runtime-endpoint: unix:///run/containerd/containerd.sock
image-endpoint: unix:///run/containerd/containerd.sock
timeout: 10
debug: false
#Enable the containerd service:
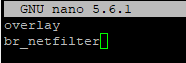
systemctl enable --now containerd.serviceOpen the Kubernetes modules configuration file and add these two modules. Save the file and exit.
nano /etc/modules-load.d/k8s.conf

##Add these two lines into k8s.conf
overlay
br_netfilter
Kubernetes requires these kernel modules to enable:
-Container networking
-Bridged traffic forwarding
-IPTables packet filtering (for Pod-to-Pod & Pod-to-Service communication)
# run these commands to load the modules
modprobe overlay
modprobe br_netfilter
Modify SELinux (on All nodes including HAPROXY):
#Change the SELinux mode to permissive
setenforce 0
sed -i --follow-symlinks 's/SELINUX=enforcing/SELINUX=permissive/g' /etc/sysconfig/selinux
sestatus
Make sure Current mode is set to permissive.

Because this is a test environment, I have disabled the Firewall completely on my nodes. In production environment, it is recommended to add the following exceptions to allow Kubernetes to communicate via dedicated ports.
On Master Nodes:
sudo firewall-cmd --permanent --add-port=6443/tcp
sudo firewall-cmd --permanent --add-port=2379-2380/tcp
sudo firewall-cmd --permanent --add-port=10250/tcp
sudo firewall-cmd --permanent --add-port=10251/tcp
sudo firewall-cmd --permanent --add-port=10259/tcp
sudo firewall-cmd --permanent --add-port=10257/tcp
sudo firewall-cmd --permanent --add-port=179/tcp
sudo firewall-cmd --permanent --add-port=4789/udp
sudo firewall-cmd --reload

On Worker Nodes:
sudo firewall-cmd --permanent --add-port=179/tcp
sudo firewall-cmd --permanent --add-port=10250/tcp
sudo firewall-cmd --permanent --add-port=30000-32767/tcp
sudo firewall-cmd --permanent --add-port=4789/udp
sudo firewall-cmd --reload
Configure Networking: (on Master and Worker Nodes):
Kubernetes requires filtering and port forwarding enabled for packets going through a network bridge.
nano /etc/sysctl.d/k8s.conf
#Ensure the file contains the following lines:
net.ipv4.ip_forward = 1
net.bridge.bridge-nf-call-ip6tables = 1
net.bridge.bridge-nf-call-iptables = 1

#Apply the changes
sysctl --system
Disable Swap (on Master and Worker Nodes):
For performance reasons and the maximum utilization of each node's resources, Kubernetes requires virtual memory to be disabled on each node.
swapoff -a

#This command comments out the swap entry in the /etc/fstab file, so swap will stay disabled after reboot.
sed -e '/swap/s/^/#/g' -i /etc/fstab
Install K8s Tools: (on Master and Worker Nodes):
Create a repository file for Kubernetes.
cat <<EOF | sudo tee /etc/yum.repos.d/kubernetes.repo
[kubernetes]
name=Kubernetes
baseurl=https://pkgs.k8s.io/core:/stable:/v1.29/rpm/
enabled=1
gpgcheck=1
repo_gpgcheck=1
gpgkey=https://pkgs.k8s.io/core:/stable:/v1.29/rpm/repodata/repomd.xml.key
EOF
Refresh the local repository cache. It will ask you to verify. Type y hit enter.
dnf makecache
Install the packages
dnf install -y {kubelet,kubeadm,kubectl} --disableexcludes=kubernetes
systemctl enable kubelet
systemctl is-enabled kubelet
Install and Configure HAProxy and Keepalived (on HAProxy Nodes):
The following setting tells the Linux Kernel to enable IP Forwarding. HAProxy listens on a Virtual IP (VIP) provided by Keepalived. When traffic comes to this VIP, HAProxy must accept it and forward it to backend nodes. Otherwise the kernel would block forwarding traffic to backend nodes.
nano /etc/sysctl.d/99-haproxy.conf

#Add this line into 99-haproxy.conf, save and exit.
net.ipv4.ip_forward = 1

#Then Apply:
sysctl --system
Install HAProxy and KeepAlived
dnf install -y keepalived haproxy
Edit HAProxy config file
nano /etc/haproxy/haproxy.cfg

#add the following lines at the end of haproxy.cfg
#---------#--------- Kubernetes API Load Balancer ----------#----------#
frontend kubernetes-frontend
    bind *:6443
    mode tcp
    option tcplog
    default_backend kubernetes-backend

backend kubernetes-backend
    mode tcp
    balance roundrobin
    option tcp-check
    server master1 192.168.204.23:6443 check
    server master2 192.168.204.24:6443 check
    server master3 192.168.204.25:6443 check
#---------#--------- Kubernetes API Load Balancer ----------#----------#
Then on the same config file, find "option forwardfor" and comment it out. Save and Exit.

We do this because Kubernetes API Server already handles X-Forwarded-For headers automatically. So we Avoid double or conflicting headers.
We also need socat on HAProxy nodes to check health of backend master servers.
dnf install -y socat
nano /etc/haproxy/haproxy.cfg

#Add the following line in the global section of haproxy.cfg
stats socket /var/run/haproxy/admin.sock mode 600 level admin
Make sure if the haproxy config file syntax is valid
haproxy -c -f /etc/haproxy/haproxy.cfg
We configured HAPRoxy to create a UNIX admin socket. We need to keep this config permanent meaning it should not get lost after a reboot.
mkdir -p /etc/systemd/system/haproxy.service.d/
nano /etc/systemd/system/haproxy.service.d/override.conf

#add the following lines in override.conf and Save and Exit
[Service]
ExecStartPre=/bin/mkdir -p /var/run/haproxy
ExecStartPre=/bin/chown haproxy:haproxy /var/run/haproxy

systemctl daemon-reload
systemctl restart haproxy
We can now edit Keepalived configuration. Make sure you change the interface id (mine is ens160), auth pass value and VIP address.
nano /etc/keepalived/keepalived.conf

Remove the existing configuration and paste the following instead.
#--------- # Keepalived configuration for Kubernetes API Load Balancer VIP----------#
vrrp_instance VI_1 {
    state MASTER
    interface ens160
    virtual_router_id 51
    priority 100
    advert_int 1
    authentication {
        auth_type PASS
        auth_pass 1234
    }
    virtual_ipaddress {
        192.168.204.20
    }
}
#--------- # Keepalived configuration for Kubernetes API Load Balancer VIP----------#
On haproxy2 node, change state to BACKUP and priority to 90.

Enable HAProxy and Keepalived services. We can ping to VIP address (ping 192.168.204.20) now.
systemctl enable --now haproxy keepalived
Initializing K8s Cluster (only on node master1):
kubeadm init \
--control-plane-endpoint "192.168.204.20:6443" \
--upload-certs \
--pod-network-cidr=10.100.0.0/16

mkdir -p $HOME/.kube
cp -i /etc/kubernetes/admin.conf $HOME/.kube/config
chown $(id -u):$(id -g) $HOME/.kube/config

#Then Test it
kubectl get nodes
kubectl get pods -A
We confirmed that;
The etcd service is up and running
The Kubernetes API server is up
Controller manager is active
CoreDNS pods are stuck in Pending because they require networking provided by CNI(Container Network Interface) which we will install and configure in the following step.

Install Calico CNI Plugin (only on node master1):
Firstly, download & apply Calico manifest
#Download & apply calico manifest
curl https://raw.githubusercontent.com/projectcalico/calico/v3.27.2/manifests/calico.yaml -O

#Apply
kubectl apply -f calico.yaml

#Wait a few minutes and then Verify
kubectl get pods -A
kubectl get nodes
All pods should be running now. Our Kubernetes control-plane on master1 is now fully operational and healthy.

Join Master2 and Master3 to the K8s Cluster:
Step1: On Master1, we need to generate a token. Save the output to a text file.
kubeadm token create --print-join-command --ttl 0
Step2: Again on Master1, Get the Control-Plane Certificate Key. Save the output to a text file.
kubeadm init phase upload-certs --upload-certs
Step3: On Master2 and Master3 run the following
kubeadm join 192.168.204.20:6443 \
--token <token-from-step1> \
--discovery-token-ca-cert-hash sha256:<hash-from-step1> \
--control-plane --certificate-key <key-from-step2>
It will look like this

Step4: On Master2 and Master3, run the following commands
mkdir -p $HOME/.kube
cp -i /etc/kubernetes/admin.conf $HOME/.kube/config
chown $(id -u):$(id -g) $HOME/.kube/config
Then on any master verify all masters are Ready
kubectl get nodes
Join Workers to the K8s Cluster:
On each worker node, use the same kubeadm join command you generated earlier (without the --control-plane flag).
kubeadm join 192.168.204.20:6443 \
--token <your-token> \
--discovery-token-ca-cert-hash sha256:<your-hash>
It will look like this

Verification:
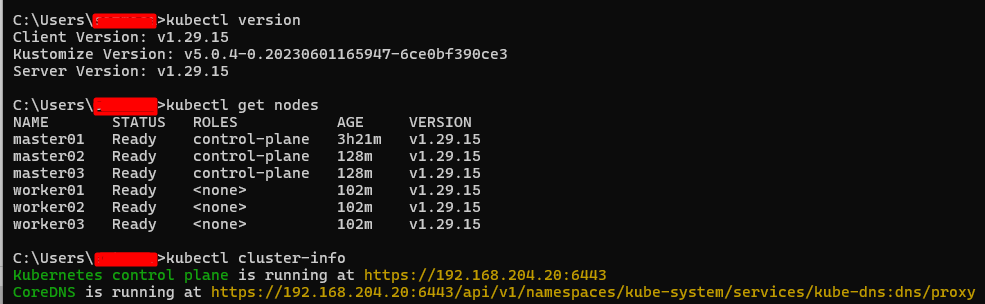
On Master1, check if all nodes are Ready.
kubectl get nodes
kubectl get nodes -o wide
kubectl cluster-info
On HAProxy node, you can check if the backend nodes are UP.
echo 'show stat' | socat unix-connect:/var/run/haproxy/admin.sock stdio | grep master
If you run the following command you will see some pods (init containers) are exited. Because they are supposed to run once and exit. So, that' normal.
If you want to clean up and remove exited container, you can run the following on any master.
crictl ps -a --state Exited -q | xargs crictl rm
We completed K8s cluster installation and configuration.
Shutdown and Recovery Procedure:
To properly shutdown K8s cluster nodes we need to follow the following procedure.
Shutdown Procedure:
1. Drain Workloads (Optional- Must be run from any master node where kubectl is configured and can talk to the API server.)
kubectl drain worker1 --ignore-daemonsets --delete-emptydir-data
kubectl drain worker2 --ignore-daemonsets --delete-emptydir-data
kubectl drain worker3 --ignore-daemonsets --delete-emptydir-data
2. Shutdown Worker Nodes
Poweroff
3. Shutdown Master Nodes
poweroff
4. Shutdown HAProxy + Keepalived Nodes
poweroff
Recovery Procedure:
1. Start HAProxy + Keepalived Nodes
2. Power On Master Nodes
3. Power On Worker Nodes
Because we drained workers before shutdown, scheduling gets disabled. We need to uncordon workers on any master node by running this:
#Run on any Master
kubectl uncordon worker1
kubectl uncordon worker2
kubectl uncordon worker3
#Verify Pods on Master
crictl ps -a

#If there are exited old pods, you can safely remove them with the command:
crictl ps -a --state Exited -q | xargs crictl rm
#Check Cluster Health on Master
kubectl get nodes
kubectl get pods -A

#Verify if backend nodes are UP on HAProxy
echo 'show stat' | socat unix-connect:/var/run/haproxy/admin.sock stdio | grep master
Configuring K8s Management Machine:
Actually we are done. K8s cluster is up and ready. However, To manage K8s and run K8s commands, I need a K8s Management Machine. In this case, it’s going to be my Windows laptop. In Production, generally there would be a bastion host, though.
A. Install Kubectl on management Machine:
Step1: Install Kubectl on your Laptop Computer by following link.
Note: It is recommended that the kubectl version difference on management machine and API Server should be + 1 or – 1. The version on my API server (master node) is v1.29.15. So I will install the same version for my management machine (my laptop computer)
https://kubernetes.io/docs/tasks/tools/
The correct installation link for my case is:
https://dl.k8s.io/release/v1.29.15/bin/windows/amd64/kubectl.exe
Copy the exe file to C:\Tools\kubectl\ .
Add this folder to the SYSTEM PATH: Run “sysdm.cpl” command > Advanced > Environmental Variables > Under System Variables, select Path and click Edit button > Click New > Paste “C:\Tools\kubectl\”
You can test by running the following command:
kubectl version --client
Step2: Copy Kubeconfig (/etc/kubernetes/admin.conf) from master01
Create "C:\Users\<yourusername>\.kube\" folder.
Create a text file named "config" in .kube folder and copy the content of admin.conf into the file "config".
Step3: To Test if it works, run the following commands
kubectl version
kubectl get nodes
kubectl cluster-info
B. Install Helm on management Machine:
Helm is a client-side tool. it doesn't run "inside the Kubernetes cluster" like kubectl. It runs from your admin machine, jump host. I am using my laptop as the management Windows machine.
Download helm from https://github.com/helm/helm/releases/latest
Extract and move it to directory : C:\Tools\helm
Add "C:\Tools\helm" directory to your system PATH

Open up a new CMD (Command Prompt) and type "helm version" to check if it works.
In the next article, we will install NGINX Ingress Controller for our K8s Cluster